for Education
- Google Classroom
- Google Workspace Admin
- Google Cloud

Google Classroom is turning 10. Find out what we've learned and what we're doing next. 🎉
Easily distribute, analyze, and grade student work with assignments for your lms.
Assignments is an application for your learning management system (LMS). It helps educators save time grading and guides students to turn in their best work with originality reports — all through the collaborative power of Google Workspace for Education.
- Get started
- Explore originality reports

Bring your favorite tools together within your LMS
Make Google Docs and Google Drive compatible with your LMS
Simplify assignment management with user-friendly Google Workspace productivity tools
Built with the latest Learning Tools Interoperability (LTI) standards for robust security and easy installation in your LMS
Save time distributing and grading classwork
Distribute personalized copies of Google Drive templates and worksheets to students
Grade consistently and transparently with rubrics integrated into student work
Add rich feedback faster using the customizable comment bank
Examine student work to ensure authenticity
Compare student work against hundreds of billions of web pages and over 40 million books with originality reports
Make student-to-student comparisons on your domain-owned repository of past submissions when you sign up for the Teaching and Learning Upgrade or Google Workspace for Education Plus
Allow students to scan their own work for recommended citations up to three times
Trust in high security standards
Protect student privacy — data is owned and managed solely by you and your students
Provide an ad-free experience for all your users
Compatible with LTI version 1.1 or higher and meets rigorous compliance standards

Product demos
Experience google workspace for education in action. explore premium features in detail via step-by-step demos to get a feel for how they work in the classroom..
“Assignments enable faculty to save time on the mundane parts of grading and...spend more time on providing more personalized and relevant feedback to students.” Benjamin Hommerding , Technology Innovationist, St. Norbert College

Classroom users get the best of Assignments built-in
Find all of the same features of Assignments in your existing Classroom environment
- Learn more about Classroom
Explore resources to get up and running
Discover helpful resources to get up to speed on using Assignments and find answers to commonly asked questions.
- Visit Help Center

Get a quick overview of Assignments to help Educators learn how they can use it in their classrooms.
- Download overview

Get started guide
Start using Assignments in your courses with this step-by-step guide for instructors.
- Download guide

Teacher Center Assignments resources
Find educator tools and resources to get started with Assignments.
- Visit Teacher Center

How to use Assignments within your LMS
Watch this brief video on how Educators can use Assignments.
- Watch video

Turn on Assignments in your LMS
Contact your institution’s administrator to turn on Assignments within your LMS.
- Admin setup

Explore a suite of tools for your classroom with Google Workspace for Education
You're now viewing content for a different region..
For content more relevant to your region, we suggest:
Sign up here for updates, insights, resources, and more.
Canvas @ Yale
- Canvas Assignment Tool: Overview
Updated on Mar 22, 2022
The Canvas Assignments tool is one of several native Canvas tools that allows instructors to collect student work for grading. Through the Canvas Assignment tool, students can submit their completed work and instructors can easily collect and score the work either offline (by downloading all submissions with a single button click) or online through the Canvas SpeedGrader function. Canvas Assignments can also be used to create columns in the gradebook for grading student work that is not submitted online.
Several of the External Applications integrated into Canvas work in coordination with the Canvas Assignments tool. For these tools, you will still create the Canvas Assignment as normal, but you will need to follow the detailed instructions for the specific external application to properly link it to the Canvas Assignment. Visit our Instructional Tools support page and click on the appropriate tool for details.
Table of Contents
This article will address the following information:
Why use Canvas Assignments?
Use cases for assignments, how do i use canvas assignments in my course, what will my students see, additional resources, for students.
Canvas Assignments are a great centralized location to find and submit their coursework. It can provide students with detailed instructions for each assignment, due dates, template files for students to use when applicable, and rubrics to help students understand what is expected to achieve full credit for their work. Canvas' online grading via the SpeedGrader tool is a core feature of the Canvas Assignment tool, which allows students to quickly receive and reply to instructor comments on their work. Canvas Assignments also work hand-in-hand with the Canvas Grades area, so students can quickly see how well they did on each assignment and how they are doing overall in the course in one place.
For Instructors
Canvas Assignments streamlines the way that student work is collected. Instead of receiving digitally completed homework in the form of individual emails from each student for each assignment, instructors can create a Canvas Assignment to collect the work of all students. With Canvas' online grading tools, instructors can use rubrics for consistent grading and can use the Canvas SpeedGrader tool to provide detailed annotations on student-submitted files or simply use the one button download all submissions button to export all student files at once to their local computer. The Canvas Assignments tool also allows instructors the flexibility to assign activities to specific due dates for individual students or even create activities that are only available to certain students.
Canvas Assignments can be used in many ways—below are just a few examples of how assignments can be used in your course:
- Homework Assignments
- Research Papers
- Written Exams
- Handwritten Student Work (check out our help article for students on how to create a PDF of handwritten work )
- Overall grade for course (that differs from the Canvas-calculated Totals column)
- Grade for an oral exam or other activity that does not require students to hand in work
- Class participation grade
- Peer Review Assignments – students can be assigned to read and comment on one or more of their classmates' submissions
- Group Assignments – require one submission for a group of students
Instructor and TA level users can always access the tool to create and organize activities, but the tool can be hidden from students if desired. To learn more about how to use Canvas Assignments to facilitate your online course work, please reference:
- Creating an Assignment
- Grading Assignments Using the SpeedGrader
- Due Dates versus Display Dates
- How do I automatically assign peer reviews for an assignment?
- How do I view student peer review comments as an instructor?
- How do I assign an assignment to a course group?
- Turnitin Assignment Settings Options
- Viewing a Turnitin Report (Instructor)
The actual view your students see will depend on the settings you set on your assignments. Below you can see what a student would see for an online, file upload submission type assignment.
On each assignment, instructors can set an " Available From " date, which is the date when the assignment will open for students to start submitting their work. Even though an assignment may not yet be open, students will be able to see that there is an assignment and will be able to click on it.
When a student views an assignment that has not opened for submissions yet, they will see a message showing that the assignment is locked and the date when the assignment will open, which is the " Available From " date.

When going to submit a file, the students will see the assignment instructions, points, due / available from / until dates, and the rubric (if one exists). The students will submit by clicking the " Submit Assignment " button and following the process to upload and submit their file(s).
Creating Assignments
- Duplicating an Assignment
- How do I exclude an assignment from the course's final grades?
- How do I bulk update due dates and availability dates as an instructor?
- How do I add a rubric to an assignment?
- Rubrics (Vendor Guides)
Assignment Groups (For organizing assessments and weighting grades)
- How do I add an assignment group in a course?
- How do I move or reorder an assignment group?
- How do I move or reorder an assignment?
- Creating Weighted Assignments Groups
Grade Posting Policies
- How do I select a grade posting policy for a course in the Gradebook?
- How do I select a grade posting policy for an assignment in the Gradebook?
- Using the Grade Posting Policy
Student Resources
- How to create a PDF of hand written assignments
- How do I submit an online assignment?
- How do I upload a file as an assignment submission in Canvas?
- How do I submit a text entry assignment?
- How do I enter a URL as an assignment submission?
- How do I submit a media file as an assignment submission?
For more help, please contact [email protected] .
Discover Instructional Tools
- Assessment Finder Tool
- Canvas @ Yale External Applications: Overview
- Feedback & Accessibility Barriers Tool: Overview
- Panorama: Overview
- FeedbackFruits: Overview
- Canvas Quizzes: Overview
- Gradescope: Overview
- Respondus LockDown Browser: Overview
- Turnitin: Overview
- LabArchives: Overview
- WordPress: Overview
- Canvas Collaborations: Overview
- Canvas Groups: Overview
- Canvas Announcements: Overview
- Canvas Inbox: Overview
- Canvas Modules: Overview
- Canvas Pages: Overview
- Canvas Syllabus: Overview
- Photo Roster: Overview
- Canvas Discussions: Overview
- VoiceThread: Overview
- Ed Discussion: Overview
- Perusall: Overview
- Mid-Semester Feedback: Overview
- Post'Em: Overview
- Qualtrics LTI: Overview
- Poll Everywhere: Overview
- Media Library (Panopto): Overview
- LinkedIn Learning: Overview
- Zoom: Overview
Other Resources
- Accessibility
- Inclusivity
- Canvas @ Yale Settings
- Enrollment & Permissions
- Technical Support Guides
- Updates & Known Issues
- Canvas @ Yale Admin / Registrar
- Instructor Getting Started Guides
- Course Management
- Assessments, Feedback and Grades
- Canvas @ Yale External Applications
- Instructor FAQ
- Student Getting Started Guides
- Student Assessment Guides
- Student FAQ
- Learning Management System Support >
- Guides for Instructors >
- Assessments and Grading >
Assignments
Create assignments in UB Learns to promote student interaction and learning progress in your class.
Assignments often make up a large portion of student interactions within a course. They can include active learning , group work , formative assessments , culminating projects and much more.
The Assignments tool in UB Learns offers robust features to customize instructions, submissions and assessment types. Tools that complement Assignments include Content, Rubrics and Grades. As always, ensure any embedded multimedia or attachments are accessible for all students.
For additional support beyond this page, visit Brightspace’s Create an assignment webpage.
On this page:
Preparing an assignment.
There are several considerations to make before creating an assignment. Although assignments can be edited later on, it will be more time efficient to plan ahead.
General Preparation
Before creating an assignment, it is helpful to have some information upfront such as the assignment name, description and point value. If your syllabus is finalized, you may also want to include the due date while creating the new assignment.
Adding a due date to an assignment will enable it to populate in the course schedule.
Advanced Preparation
- Rubrics : Consider how this assignment will be graded. If grading with a rubric, it is best to first create the rubric and then attach it to the assignment.
- Grade Categories : You may want to create weighted categories within the Grades Tool before creating assignments. This will allow you to categorize assignments as they populate the grade book.
- Assignment Category : This category is separate from the grade categories. It serves more as a grouping and organization system. For example, this can be used to categorize items such as homework, presentations or to provide more granular detail.
- Release Conditions : You may choose to limit access to this assignment until after completing a prerequisite task such as a quiz or discussion post. Create the first task prior to creating the assignment.
- Group Assignments : In order to assign collaborative assignments, the groups must already be created.
- Special Access: Special access allows you to set different availability dates and times for specific users. For example, you could extend the deadline for users who require remedial help or who are submitting work beyond the original scope of the assignment. Learn more about Special Access.
Where to Build Assignments
You can begin creating a new assignment in two ways. Both will take you to the same page.
- On the navbar, click Content . Navigate to a module, click Upload/Create and select New Assignment .
- On the navbar, click Assessments and select Assignments .
Creating an Assignment
Use the Assignments tool to create and edit assignments, add rubrics, view student submissions and add grades and feedback.
How to Create an Assignment
- Click New Assignment .
- Enter a name in the Assignment Title field.
- Once you enter the maximum points, a drop-down menu will appear to the right of Grade Out Of. The menu contains additional options: Edit or Link to Existing (when you have already created a grade item in Grades), Not in Grade Book and Reset to Ungraded .
- Add a Due Date if necessary.
- Add Instructions if necessary
- Upload files (cloud icon), add links , Record Audio or Record Video if necessary.
- Start and end dates and how how the assignment appears to students before the start date and after the end date.
- Release conditions.
- Special access (allow the assignment to be available at different times for specific students) .
- Type of assignment (individual or group).
- Category the assignment will be placed under in Assignments. This is for organizational purposes only.
- Submission type (file, text, on paper submission or observed in person).
- Files allowed per submission (students can upload only one file or an unlimited files).
- Allowable file extensions that can be uploaded.
- Whether all submissions are kept or only the most recent. Note: if you select Only the most recent submission is kept, UB Learns will permanently deletes past submissions.
- Add an email address to be notified when an assignment is submitted
- Add a rubric.
- Enable the annotation tool when grading.
- Anonymous marking of assignments.
- Turnitin settings.
- Click Save and Close .
Editing an Assignment
- On the Assignments main page, you will see a list of all your existing assignments.
- Locate the assignment you want to change and select the chevron icon [⌵] to the right of the assignment's name.
- Here you can edit, copy or delete the assignment. You can also edit the assignment within a module. Please note that this functionality is limited.
Placing Assignments in Modules
- Within the Content tool, locate the module in which you would like students to access the assignment.
- After selecting this module, click Existing Activities , then select Assignments .
- Select the assignment you would like to add, searching by name if necessary.
- Then drag the assignment so that the order/placement within the module is correct.
Adding Restrictions and Rubrics to an Assignment
You may want to set additional conditions to an assignment, such as availability, release conditions, rubrics and/or special access.
Add Restrictions to an Assignment (Video)
Adding Rubrics to Assignments
Before attaching a rubric, ensure it is complete and its status is set to published .
- Create or edit the assignment (see above).
- Locate the Evaluation & Feedback category in the right-hand column and expand the section.
- Select Add Rubric and choose an existing rubric or create a new rubric.
- Click Save and Close.
Using a Rubric
First, select the submission you would like to assess. The rubric will populate on the righthand side of each submission under the Evaluation and Feedback header. Open the associated rubric and select the performance level for each of the criterion. Use the preassigned feedback or customize sections as desired. If the rubric uses points or percentages, the grade will calculate automatically, however, you can manually change category scores, total score and overall score. When finished with the rubric, select Close .
Grading an Assignment
There are several ways to grade in Brightspace. If grading submissions from a single assignment, locate it within the Assignments tool. If grading submissions from several assignments, you can use the Quick Eval tool.
If using the Quick Eval tool, all submissions that need grading will populate here including assignments, quizzes and discussions. Therefore, if you are looking to grade a specific assignment, it will likely be more efficient to do so from the assignment itself within the Assignments tool.
Grade Submissions in Assignments (Video)
Annotating an Assignment
While grading students’ submissions, you can digitally insert notes, highlight text and write directly on the document to give meaningful feedback .
Use Inline Annotation in Brightspace (Video)
Additional Resources
Getting Started with Canvas Assignments
- Last modification date Updated On July 26, 2024
- Categories: Assignments , Canvas , Uncategorized
- Categories: assessment , Getting Started , Grading

Canvas Assignments are a way for instructors to provide students opportunities to practice using the knowledge and skills they have gained or to assess student performance related to such knowledge and skills. (Creating an Assignment is the only way to create a new column in the Gradebook.)
In Canvas there are four basic Submission Types for assignments. The submission types include:
- No Submission : For assignments for which you are not collecting any content from the students.
- Text Entry : For students to enter text directly into a text box on Canvas.
- Website URL : For students to enter a URL (usually to a blog, video, podcast, etc.).
- Media Recordings : For students to upload or record media for submission.
- File Uploads : For students to upload files for submission ( Restrict Upload File Types will allow you to limit which types of files may be submitted).
- On Paper : For assignments students will submit in person.
- External Tool : For assignments which students will submit through a third-party tool (such as Turnitin, Panopto Video Quiz, and PlayPosit).

Managing an Assignment
Managing assignment groups.
When getting started with Assignments, learn to
- Create an assignment shell with the Canvas guide How do I create an assignment?
If you select Peer Reviews Appear Anonymously , annotation tools in SpeedGrader will become unavailable.
If you change the Assign To area from Everyone to select students after submissions have already begun, and do not have a second set of Assign To dates, submissions from unassigned students will disappear.
- Published assignments are visible as existing outside of availability dates, but students cannot see the details.
- If looking to update the due and/or availability dates on multiple assignments, see How do I bulk update due dates and availability dates as an instructor?
- If choosing the option to make an assignment a Group Assignment : If only assigning to specific groups, make sure to click the X on the Everyone Else choice under Assign to .
Media Recording Assignments are not recommended due to technical reasons. Instead, have students submit media by embedding it in a Text Entry assignment through Panopto .
Clearly express expectations and criteria for grading by using a Rubric .
Be cautious limiting submission attempts, as students often make mistakes loading documents and need multiple attempts to ensure you have the correct submission.
- Delete an assignment with the Canvas guide How do I delete an assignment?
- This duplication process will not work for Quizzes.
- Attach a rubric to an assignment for grading or to communicate expectations to students with the Canvas guide How do I add a rubric to an assignment?
Accessibility Tips
- Use descriptive text for links, instead of long URLs or ‘click here’.
- Make instructions brief and to-the-point. Avoid long paragraphs and sentences.
- Consider allowing multiple submission types to accommodate technical limitations students may face.
Assignment Groups are a way to categorize different graded items in Canvas. For example, you may have journals, blogs, and essays which your students create in your course. Assignment Groups allow you to label and group different types of assignments separately in order to better organize and for ease when applying weighting (see How do I weight the final course grade based on assignment groups? ). When getting started with Assignment Groups, learn to
- Add and delete assignment groups with the Canvas guide How do I add an assignment group in a course?
- Move or reorder an assignment group with the Canvas guide How do I move or reorder an assignment group?
- Make rules governing grading expectations within assignment groups with the Canvas guide How do I create rules for an assignment group?
Additional Resources
- CTI Resource: What is the Assignments Index Page?
- How do I bulk update due dates and availability dates as an instructor?
- How do I weight the final course grade based on assignment groups?
- Canvas Student Guide

Subscribe By Email
Get a weekly email of all new posts.
Your Email Leave this field blank
This form is protected by reCAPTCHA and the Google Privacy Policy and Terms of Service apply.
- Current Students
- Future Students
- Faculty & Staff
- Centers Reservations
- Colleague UI
- D2L Brightspace (eLearning)
- Etrieve Central
- Password Management
- PeopleAdmin
- Self-Service – Employees
- Self-Service – Faculty
- Board Approved Policies
- Business Services
- College Calendars
- Employee Training (COS)
- Human Resources
- Office of Information Technology
- Online Learning
- President's Office
- Report an Incident
- Student Support System (SSS)
Assignments Tool
Assignment Dropbox is where users can submit files for assignments. TurnItIn originality checking is integrated with Assignments, generating originality reports to review possible instances of plagiarism in submitted files. Submitted files can also be evaluated within the Assignments tool, and evaluations can be associated with grade items in Grades.
- Select assignments in the course navigation bar.
- Select the New Folder button.
- Enter a title for the folder in the "Name" field.
- By default, the "Grade out of" field is ungraded. To change this, select Ungraded.
- Enter in a point value.
- Edit or Link to Existing: Link the assignment to an existing or new item in Grades.If the grade item was not created, select the option Create and link to a new grade item. Choose the type of grade item to create and the grade scheme to use. If using categories, select a category. When finished select OK. If the grade item was already created, select the option to Link to an existing grade item. Choose the item from the dropdown list and select OK.
- Not in Gradebook: Attach a score to the assignment that will not be included in Grades.
- Reset to Ungraded: Resets the score to the default setting of "Ungraded."
- Due Date: Set a date for the assignment to show up in the course calendar.
- Instructions : Enter any steps for the assignment to be submitted.
- Add Files : Use the icons in the tool bar to add any files, links, video, or audio to the folder. Hover over the icons to see the function.
- Availability Dates & Conditions : Select this tab to restrict access to the folder by adding a Start Date and/or End Date.
- Submission & Completion : Select this tab to set up a group assignment, change the assignment type, alter the number of assignments each student can turn in, or set up email notifications for assignments from specific students. See Setting up a Group assignment for instructions on group assignments folders.
- Evaluation & Feedback : Select this tab to attach a rubric, add learning objectives, or add Turnitin. See Rubrics in D2L and Using Originality Checking for more information.
Set Start, End, and Due dates on a assignment folder to control access to assignment folders.
- A start date indicates when the assignment is released to students. Prior to the start date, students will be able to see the assignment folder, but they will not be able to access it.
- A due date is the instructor-given date (and time) deadline for submitting an assignment. However, a student may submit after the due date (up until an end date, if one is set), in which case it is marked late, in red, in both the instructor and the student view.
- An end date is more restrictive. It cuts off the assignment folder at the end date and time set, so students can no longer submit work after that date.
If a due date and end date are both set, then the assignment can be submitted late, after the due date, until the end date is reached.
Set dates on assignments
- Select the dropdown arrow next to the assignment folder.
- Select Edit Folder.
- The "Edit Folder" page will open. Select the Availability Dates & Conditions tab.
- Start Date: A start date prevents access to the folder before the specified date and time.
- End Date: An end date will prohibit assignments after the specified date and time.
- Use the calendar to select the date.
- Once the date is selected, it will appear next to a time. The default time is 11:59 PM, but any time can be entered by selecting the field.
- Once complete, select Save and Close.
Hide assignment folders
- Select the dropdown arrow next to the Assignment folder.
- Select Hide From Users
Make assignment folders visible
- Select Make Visible to Users
Grade files submitted to Assignment Dropbox
- Select Assignment Dropbox on the course navigation bar.
- Select the name of the assignment folder.
- Select the name of the file the student submitted.
- Enter a numeric value in the "Score" field. (See Grade Files with a Rubric if a rubric is attached to the folder.)
- Type or paste qualitative comments in the "Overall Feedback" field.
- (Optional) Use the icons in the tool bar to add any files, links, video, or audio to the folder. Hover over the icons to see the function.
- Save feedback.
- Select Save Draft to hide feedback from students, or select Publish to make the feedback available to students.
- Select the arrow to navigate to the next file or Back to Folder assignments if finished reviewing files.
Grade files in an assignment folder with a rubric
- Open the assignment within the assignments area.
- Select the rubric.
- The rubric will release within the assignment window. For each criterion, use the evaluation panel to select the appropriate scoring level for the assignment.
- Add qualitative feedback for any criterion by selecting the Add Feedback link under it.
- The overall score will populate in the "Overall Grade" field as the rubric is completed. Add any additional feedback.
- Select the arrow to navigate to the next file or Back to Folder assignments if finished reviewing files.
Give audio feedback on a file submitted to an assignment folder
- A working microphone connected to the device is needed for this function to work.
- Select the Record Audio button under the "Overall Feedback" field.
- Select New Recording when ready to speak.
- Select Stop Recording when finished.
- Select the play button to preview the recording.
- Select Add when satisfied with the recording.
Evaluating students without assignments in an assignment folder
If students have not submitted files to a assignment folder, instructors can still provide feedback.
- Select assignments on the course navigation bar.
- Select the Show Search Options link.
- Under "assignments," use the dropdown menu to select Users without assignments.
- Select the magnifying class in the "Search For..." text box .
- Select the Evaluate link for the student.
Add a file for a student
While there is no way to submit a file to a assignment folder on behalf of a student, there is a workaround to attach a file in instances where a student was not able to submit work on their own.
- Go to the assignments area.
- Select the folder.
- Select Show Search Options.
- Select the magnifying glass in the "Search For.." box.
- The page will refresh. There will a list of students who have not submitted work. Select Evaluate for the student for whom to submit a file.
- Under "Overall Feedback" select the upload icon [A].
- Upload the file.
- Select Save Draft.
- Enter any feedback or evaluate the student.
- When finished, select Publish.
D2L accepts file assignments of many types: text document, web document, image, and media. Folders are also allowed, but must be zipped (i.e., folder1.zip)
Create categories
- Navigate to Assignment Dropbox
- Click Edit Categories on the top
- Click Add Category to add a new category
- Use Sort Order to change the order of how categories are presented on the Assignments homepage.
- To delete a category, select the check box next to its name, and click the trash icon.
Put assignments in a category
- From the Assignment Dropbox page, select all the assignments you want in a category.
- Click Bulk Edit.
- Select the correct category from the dropdown.
- Click Save.
- Norsk (Bokmål)
- Português, Brasil
Create and Edit Assignments
You are viewing Ultra Course View content
This information applies only to the Ultra Course View.
Your institution controls which tools are available in the Original Course View . Assignments are always available to instructors in the Ultra Course View .
Assignments
You can create assignments alongside other content. This enables students to access their work next to the content they need, right when they need it.
When you create an assignment, you can:
- add assignment instructions and content
- control assignment visibility to students
- apply assignment settings
On this page, you can learn more about:
- Adding assignment instructions and content
Auto-generate assignment prompts
- Assignment visibility
- Presentation options
- Grading & submissions
Assessment results
Assessment security, additional tools, delete assignments, assignments and the activity stream, grade offline submissions, what do students see, watch a video about creating assignments.
For a more information about an assessment that includes questions, go to Create Tests .
More on creating assignments for groups of students
Add an assignment
When you create an assignment, a gradebook item is created automatically.
From the Course Content page, select the plus sign wherever you want to add an assignment. In the menu, select Create to open the Create Item panel and select Assignment .

The New Assignment page opens.

Enter a descriptive title so students can easily find the assignment among your course content. On the Course Content page, the title appears as the link students select to view the materials. If you don't add a title, "New Assignment" and the date appear in the content list. If you don't add content, the assignment won't appear on the Course Content page.
Add assignment instructions and content
Under Instructions , enter the instructions and content for the assignment.
You can drag and drop files from your local device or use the Insert content button to access a menu for course content types. For more information, see Create Course Materials .
Feel free to experiment! Students can't see what you add until you make your assignments visible.
Assignment Visibility
Students can't see an assignment until you choose to show it. You can create all your content ahead of time and choose what you want students to see based on your schedule. You can also set availability conditions based on date, time, and performance on other items in the course gradebook. On the Course Content page, students can see when you set the assignment to appear.

AI plagiarism is a growing concern in education. Research indicates a variety of issues with a reliance on AI detection. Detection models cannot keep up with advancements in AI technologies. Learn empowers you to take advantage of the effective practice of authentic assessment. If your institution has turned on the AI Design Assistant feature, you can auto-generate assignment prompts that encourage students to:
- engage in higher-order thinking
- apply knowledge gained from your class
- produce authentic submissions that are evidenced
- emulate real-world situations
Assignment prompts are generated based on course context. On the assignment creation page, select Auto-generate assignment .

The Auto-Generate Assignment page opens.

The AI Design Assistant generates three assignment prompts. You have several ways to define the prompts that the AI Design Assistant generates.
- Enter a description (limited to 2000 characters) to narrow the focus of the prompts
- Inspire me! provides you with a mix of levels
- Adjust the complexity of the prompts’ focus by moving the slider
- Select whether or not you want to generate a title for the prompts
- Select the arrow beside Advanced options to change the output language
Cognitive levels are based on Bloom’s Taxonomy.
Optionally, you can select which course items you’d like the AI Design Assistant to provide context for the assignment prompts. Select Select course items to start.
Select the box beside any course content item to include it in the context for your test.

You can select the arrow beside a folder or learning module to include items from them. When you’ve finished choosing items for context, select Select items to return to question generation.
File types supported by the context picker include PDF, Word, PowerPoint, text, RTF, and HTML.
Once you’ve finalized your settings, select Generate . Review each prompt for accuracy and bias. Choose the prompt you’d like to add to your assignment, then select Add .
Learn more about the AI Design Assistant
Assignment Settings
If any students in your course have accommodations , they appear in the Assignment Settings section. You can set accommodations for students and make them exempt from certain course requirements, such as assignment due dates and time limits. To modify accommodations, go to the Roster and open a student's menu. You can also access it from the Submission page or Gradebook .
On the right-hand side of the New Assignment page, under Assignment Settings , you can view the settings selected for your assignment. To choose and apply different settings, select the Settings button to open a new panel.
Details & Information
The section Details & Information provides options for assignment submission.

Provide a due date . Due dates appear on the calendar and in the activity stream. Late submissions appear with a Late label in the course gradebook. You can prohibit students from submitting work after the due date. Encourage students to review what’s due now and what’s ahead so they can ask questions as soon as possible.
Prohibit late submissions. Enforce a hard deadline and prevent a late submission. In-progress and saved attempts will auto-submit at the due date. Students will receive a submission receipt email. Specified accommodations are still honored.
If students have submitted attempts, you cannot change the due date to a date in the past. If the due date has passed, you can't select the Prohibit late submission setting.
Prohibit new attempts after due date. Prevent students from beginning a new attempt after the due date. Specified accommodations are still honored.
Allow class conversations . What if your students have questions about an assignment? You can allow conversations within an assignment, and anyone can contribute. As the conversation develops, it appears only with the relevant assignment.
More on conversations
Collect submissions offline . You may want to grade student work that doesn’t require students to upload a submission. For example, you can add grades to your gradebook for oral presentations, science fair projects, acting performances, and artwork delivered in person.
More on collecting submissions offline
Formative Tools
Formative assessments. Their primary purpose is to monitor student learning and provide immediate feedback that can be used to improve instruction and enhance student performance. Formative assessments help both you and your students to identify areas of strength and areas that need further development.
More on formative assessments
Presentation Options
If your assignment contains questions, Presentation Options allows you to control how the assignment's content is presented to students.
For more details about options in Presentation Options , go to Create Tests .
Grading & Submissions
Grading & Submissions provides options for assignment type and grading criteria.

Change the grade category . You can change the assignment's grade category to be part of one of the custom gradebook categories you set up in your course. You can create new categories to customize how coursework is grouped in your course. Custom categories can be useful when you set up the overall grade .
Determine the number of attempts . You can let your students submit more than one attempt at an assignment. When you allow multiple attempts , you can also choose how the final grade is calculated.
Select the grading schema . From the Grade using menu, select an existing grading schema such as Points . You can change the grading schema at any time, and the change will appear to students and in your gradebook.
Set Maximum points. Add a number value between 0 and 99,999 for your assignment. If you leave this field blank, the number will default to 100.
Enable anonymous grading . When you create an assignment without questions, you can enable anonymous grading. Student names are hidden while you grade. You may only add text and files to anonymously graded assignments.
More on anonymous grading

Enable parallel grading. Parallel grading assigns two graders per student. You can enable parallel grading and assign graders when you create an assignment. You can also enable parallel grading after students make submissions. The system randomly assigns graders you choose so each student has two graders for the assignment. The grading workload is distributed evenly among the graders. Graders can only open the submissions of the students assigned to them. Instructors or reconcilers determine the final grades for students.
More on parallel grading
Enable peer review. Peer review allows students to review their peers’ work through criteria-based evaluation. Select Select peer settings to assign the number of reviews per student, assessment due date, and peer review due date.
More on peer review
Parallel grading and peer review options are disabled for an assessment with questions. Parallel grading and peer review can't be enabled at the same time.
Enable assessment grade. Automatically post a student’s grade once grading is completed. Turn the setting off if you want to manually control grade publication.
If your assignment contains questions, Assessment results allows you to control how students see feedback, scores, and answers once they turn in their work.
For more details about options in Assessment results , go to this section in Create Tests .
Assessment security provides tools to secure assignments you create.

Add an access code . You can issue an access code to control when students submit an assignment. Access codes are generated randomly by the system. You can also add an access code to a group assignment.
More on access codes
Access Respondus. Respondus® is a third-party tool you can use to create, manage, and print tests in Blackboard. Select the link to launch the tool.
More on Respondus
More on Proctored Assessment
Additional Tools provides several more options to customize your assignment.

Add a time limit . A time limit can keep students on track and focused on the assignment. Each student has a limited amount of time to submit. The assignment attempts are saved and submitted automatically when time is up. You can also allow students to work past the time limit. Time limits can only be added to individual (not group) assignments.
Add a grading rubric . A rubric is a scoring tool to evaluate graded work. Rubrics can help you evaluate student submissions based on key criteria that you define. You can create a new rubric or associate an existing rubric . You can only add a rubric to as assignment without questions.
Add goals and standards . You can align an assignment to one or multiple goals . You and your institution can use goals to measure student achievement across programs and curricula. You can also align individual questions to goals.
Make a group assignment . You can create an assignment for one or more groups of students . By default, you assign a grade to each group as a whole, but you can change a group member's individual grade.
Enable SafeAssign . You can use SafeAssign to check for potential plagiarism in student submissions . You can enable the SafeAssign Originality Report any time, even after students have started their submissions. However, submissions are only checked when SafeAssign is enabled.
Add an optional description . The description appears with the assignment title on the Course Content page. This is where you can provide students with more information about the assignment. The maximum length of a description is 750 characters. A warning will appear below the description field when 75 characters or less remain.

If you go over the maximum length, a warning will indicate how many characters over the limit you are. You will not be able to save the description until your text is below the maximum length.

Edit, reorder, and delete assignments
You can make changes to existing assignments and change where they appear on your Course Content page. Be aware that if you change an existing assignment that students can access, some students may have started their submissions. You can't change the grading schema if you've already started grading.
Select the Move button in an assignment's row and move it to a new location. You can also move an assignment into a folder.
In an assignment's row, open the menu to select Edit or Delete .

You can use your keyboard to move an assignment.
- Tab to an item's Move button.
- Press Enter to activate move mode.
- Use the arrow keys to choose a location.
- Press Enter to drop the item in the new location.
You can delete an assignment from your course and if no student submissions exist, the gradebook item is also deleted. For assignments with submissions, you must confirm that you want to permanently remove the assignment, all submissions, and grades from your course.
Or, hide the assignment from students to preserve the submissions and the scores in the Gradebook. Students can't access hidden assignments on the Course Content page or on their grades pages even if you have graded submissions.
When you create an assignment and make it visible to students, they're notified in their activity streams.

After you post assignment grades, students can select View your grade to display their grades. Any feedback you provide appears after the assignment title.

You'll see an alert in the stream when you have submissions to grade. Select the assignment title to begin grading on the assignment submissions page.

More on the activity stream
Collect submissions offline
You can create assessments that appear on the Course Content page that don't require students to upload submissions. You can add instructions, files, a rubric, and goals so students can prepare for the offline work. You can also enable conversations, but you can't add questions or grade anonymously.
Examples of offline work :
- Oral presentations
- Science fair projects
- Acting performances
- Artwork delivered in person
- Face-to-face team building exercises, panel discussions, and debates
Instructors who teach hybrid courses may find this type of assessment most useful. For example, you can use a rubric to grade an in-class presentation as a student presents. No need to take notes or add a score later.
When you create an assessment, you can choose to collect submissions offline in the settings panel. When students open this type of assessment, they're informed they can't submit work online. If you create groups to collect submissions offline, students can view their group members.

For submissions collected offline, you can't allow multiple attempts, allow a time limit, or use SafeAssign.
For grades that require students to be present outside of class, such as for a guest speaker or a field trip, you can add meetings to the attendance feature.
More on adding a meeting
When you're ready to grade offline submissions, open the submissions list page from the assessment page or the gradebook. Select a student's name to open the Create Attempt panel, provide the submission date and time, and save.

On the student's submission page, you can assign a grade and use a rubric if you associated one.

Students can view the assessment alongside other content on the Course Content page and on their global and course grades pages. Students are informed they can't submit work online. They can access other information, such as the instructions and a rubric if you added one. Students can participate in the assessment's conversations if enabled.

More on the student workflow
The following narrated video provides a visual and auditory representation of some of the information included on this page. For a detailed description of what is portrayed in the video, open the video on YouTube , navigate to More actions , and select Open transcript .
Video: Create an assignment shows how to create an assignment with simplified workflows.
Learn - instructor
Need more help with learn .
Contact your institution's support desk
- Watch videos for instructors
- Join the Community
Assignments: View and evaluate assignment submissions
There are a number of different options for reviewing and evaluating student assignment submissions, as well as options for publishing grades and feedback.
We recommend reviewing these options when creating your assignments, so you can have these strategies in mind. Some of the settings are best completed before the grading has begun.
On this page:
- View student submissions
- Evaluate and provide feedback on student submissions
- Additional evaluation strategies
Assignments can be found in the top navigation, under Assessment. If it isn't there, review how to enable course tools .
View student submissions
View assignment submissions.

1. On the Assignment Submission Folders page, click on the folder you want to view submissions for, or click View Submissions .

2. By default, you should see the full list of students below. If they have submissions, you will see the submission name below the student's name. You can use the Users tab or Submissions tab to view and search submissions by user or file name. You should be able to easily find the student submission you wish to grade in the list below. If you have a large classlist, or have trouble finding a particular student, you can use the search options to find what you're looking for. If you do not see the search options, click on Show Search Options . Searching by User enables you to search by first name, last name, submissions, and feedback.

Searching by Submissions enables you to search by file name, submission date, read status, and flagged status. Filter the results using Show Search Options to access the dropdown menu and checkboxes below. Here, you can choose to display only the users with submissions, only the users without submissions, users with graded submissions that haven't been published yet, and so on. Click on the magnifying glass icon in the search box, to update the view.
3. Submissions appear at the bottom of the page.
Download assignment submissions

It is easiest to grade student submissions within D2L Brightspace, but if the nature of the assignment or file type makes this difficult, it is possible to download all student submissions to your computer.
1. Go to the Assignments tool in your course, and click the arrow to the right of the name of the assignment, and select View Submissions .

2. Using the checkboxes, select the submissions you want to download. By clicking the top checkmark, you can download all submissions on that page. (Note that you can adjust the number of submissions per page).
3. Click Download .

4. Download the resulting .zip file by clicking on the Download button in the dialogue box.
Email students who haven't submitted an assignment
If you have students who have yet to submit an assignment to a submission folder, you can email all those students at once.

1. From the appropriate assignment folder, click Email Users Without Submissions .

2. All the users without submission will appear in the BCC field.
3. Compose your email.
4. Click Send . If you are emailing a large number of students (ie. more than 100), after you click on the Send button, you may see a message that your message is queued to be sent as a background task. This is to help manage performance on the server. It should only take a few minutes for all of the emails to be sent.
Evaluate and provide feedback on student submissions
Hide the assignment results from the students.
This is a useful workflow to apply if you don't want the students to see any of their results (grades, feedback, rubrics) across any of the tools in Brightspace (Grades, Assignments and Progress). You may wish to do this while grading, so you can release all feedback to the class at the same time.
Outline of the required steps:
Hide the grade item.
- "Save draft" when grading the assignments
- Once all submissions are in, hide the assignment
- Publish the assignment grades and feedback

This step ensures the students cannot see the grade item in the Grades tool.
We recommend using this setting when creating all grade items, as it provides you with more control to release grades.
To hide the grade item:
- Go to Grades > Manage Grades , and locate the grade item you would like to hide.
- Click the arrow icon to the right of the title.
- Select Hide from users .

4. Once clicked, you will see an icon (which looks like an eye with a line through it) appear next to the grade item to indicate that it is now hidden from the students.

"Save draft" as you grade the assignment
When grading the assignment, be sure to "Save Draft" as you go.
You should wait until you have graded all of your students' submissions before "publishing", so that all students receive their grade and feedback at the same time.
Proceed to grade all of the submissions. This can happen while students are submitting (if you have allowed some extensions, for example).

After all submissions are in: hide the assignment
This step can only be completed if all of the students have submitted their assignment, as it will hide the assignment from them completely.
This ensures the students cannot see the assignment nor the assignment results (grades, feedback) in the Assignments tool nor the Progress tool.
To hide the assignment:
- Go to the Assignments tool and edit the assignment.
- At the bottom of the page, check the button to change the status to "Hidden" .
- Save the assignment.
- When viewing the list of assignments in the Assignment tool, you will now see an icon next to the assignment to indicate that it has been hidden.
Important! This step should only be taken once all of the assignment submissions are in. If there are any students who still need to submit their assignment, this will not work.

After all submissions have been graded: publish all feedback
Once you have graded all of the submissions, you can publish the assignment grades and feedback.
Note that this will not display the results to the students, because you have hidden both the grade item and the assignment in the steps above.
To publish all feedback:
- Go to the Assignments tool and view the assignment submissions.
- Click the Publish All button in the top left of the page.
This will push the score and feedback to the gradebook.

Pay attention to the information in the popup window, before you click on Publish. You will see information about any potential problems, such as partially-graded submissions. This can help you spot when you've missed something.
If you are not ready to publish all feedback yet, and want to publish the feedback in batches, please see the section on publishing feedback on this page.
Evaluate file submissions
1. On the Assignments page, click on the assignment you want to evaluate submissions for, or click on View Submissions .

2. Click on the student's submission that you wish to evaluate.
If there are multiple submissions for one student, look at the file name and submission date to determine which file you wish to evaluate.

3. If the document doesn't load, click on the file name to load the student's submission in the document viewer. Depending on the file type, the submission may appear directly in the browser. The following file types are compatible with the document viewer:
- MS Word (DOC, DOCX)
- MS PowerPoint (PPT, PPTX, PPS)
- Adobe Acrobat (PDF, PDFS)
- Web (HTM, HTML)
- Plain text (TXT)
- Images (BMP, GIF, JPG, JPEG, PNG)
If clicking on the file does not load it in the browser, the file may be in a format that the document viewer does not support. Download it to your computer, and view using the appropriate software.
NOTE: If the student has uploaded a file type that you can't open, you may need to contact the student and ask them to resubmit in a particular format (ie. DOC, PDF). If the end date for the assignment has passed, you may need to make sure the assignment is not hidden, then add the student to Special Access with a start/end date that allows them to resubmit.

4. If you choose to associate a rubric with this assignment, it will be available when grading. Detailed instructions for grading with the rubric can be accessed on our Rubrics for Assessments page.
5. Enter a score for the submission.
6. Enter written feedback, if desired. This box is ideal for shorter feedback. If you are providing more than about a page of feedback, it's better to use option 7 (below) so that students can download and read offline.
7. Feedback can also be provided as an uploaded file , or as audio or video recorded directly into the platform.
8. If you wish, you can use the annotation toolbar tools to add comments, highlight, or even draw to mark up the student's submission.
To learn more about the Annotation tool, open the Using the Annotation tool section, located on this page.
9. Select Publish when you're ready to release your feedback. Click Save as Draft if you want to publish at a later date (students won't be able to see grades or feedback until you click Publish). You can bulk publish at a later time from the Submissions page. To proceed to the next student, click on the right-facing arrow, located in the lower-right corner of the page. To go back to the previous student's submission, click on the left-facing arrow.
Evaluate text submissions

1. On the Assignments page, click on the assignment you want to evaluate submissions for, or click on the downward-facing arrow beside the assignment name, and select View Submissions .

2. For the student you wish to evaluate, click on either View Submission , or on the far right, click on Go to Evaluation (both take you to the same place).

3. The submission will load in the left pane of the evaluation screen.
4. Enter a score for the submission.
5. Enter written feedback if necessary.
6. If desired, you may attach feedback, by uploading a file , web link, audio or video.
7. Select Publish when you're ready to release your feedback. Click Save Draft if you want to publish at a later date (students won't be able to see grades or feedback until you click Publish). You can bulk publish at a later time from the Submissions page.
8. When you are ready to evaluate the next student's submission, click on the right arrow in the either the upper right or lower right of the page.
Evaluate submissions using Rubrics
Annotate student submissions.
The annotation tool in D2L Brightspace assignments allows you to mark up a student's submission as a means of providing feedback in-situ.
IMPORTANT: Annotations are not recommended for use with assistive technology. If your students use assistive technology, consider providing written feedback in the feedback field.
The "Annotations" feature can be enabled in the assignment editor, in the Evaluation & Feedback panel.

When you open a student's submission on the evaluation page, you will notice the annotation toolbar along the top of the document.
The main tools that you will use to mark up a student's document can be found under the "Annotations" tool, and are noted by an orange arrow in this screenshot.

Drawing tools include the drawing, note, text and line tools.
NOTE: The annotation tool does not autosave. Save as Draft frequently if providing extensive feedback. Otherwise, you risk losing your work if you close your browser without saving.

Under the Drawing icon, there are four options:
Drawing: Use this tool to circle or underline items of note, or draw on the document, such as editorial markup.
Freeform Highlight: Use this tool as you would a physical highlighter, to highlight an area of the document in a freeform manner.
Text Highlighter: Use this tool to highlight specific text.
Eraser: Use this tool to remove marks made with any drawing tools.
Choose a tool by clicking on the icon.

Secondary toolbar
After selecting a tool, if it has more options, you will see a secondary toolbar below the main toolbar, which provides various options, such as pen colour, pen width, etc. Click on the options to make your choices before using the tool to mark up the document.

Notes + Flags
Add a location-specific flag to your markup. The note displays an icon, and expands to reveal a longer note with optional written feedback.
- Click on the Note tool in the main toolbar, and choose the type of note and style: colour, font, etc in the secondary toolbar.
- Click where you would like to place the note, and type your message. Once you are done, click out of the note.
- Save as Draft frequently if providing extensive feedback or multiple notes.

Annotated Text
If you want to add a small piece of text to your markup:
- Click on the Text tool in the main toolbar, and choose colour, font, etc in the secondary toolbar.
- Click where you would like to place the text, and type your message. While the text is active, you may notice a red squiggle under any possible spelling errors. Click and type to correct. Once you click out of the text, you will no longer see the spellchecking indication.
NOTE: This tool is intended only for short pieces of text. We recommend using the note tool or the Overall Feedback box for longer messages.

Undo/Redo your last action
If you accidentally did something in the annotation tool, if you haven't clicked on anything else, you can click on the Undo button.
Similarly, if you accidentally clicked on the Undo button and haven't clicked on anything else, click on the Redo button to restore that action.
You can also use keyboard shortcuts:
- Ctrl-z (PC) / Command-z (Apple) - Undo
- Ctrl-Shift-z (PC) / Command-Shift-z (Apple) - Redo
If you discover your mistake after you have clicked on other things, see the instructions below to delete a markup item.

Delete a markup item
To remove a markup item:
- Click on the hand icon in the main toolbar.
- Click on the item to be deleted.
- Click on the trash can, located on either the far left or far right of the secondary toolbar.

View and mark up document in full screen
If you wish to view a student's document in full screen, you can do this by clicking on the Toggle Fullscreen icon, located on the far right of the main toolbar.
Exit full screen
When you wish to exit full screen mode, and view the document back in D2L (so you can Publish or Save Draft), click on the Toggle Fullscreen icon, located in the far upper-right of the screen.

Rotate page
Depending on the format of a learner submission, documents may appear rotated when initially rendered in the document viewer. Use the Page Rotation tool to quickly reorient the document so it displays as expected.
You can find this tool under the Page Layout icon, which looks like a gear.
Additional evaluation options
Evaluate submissions with anonymous grading.

Avoid unconscious bias in the grading and feedback process by configuring assignments to anonymize learner names.
When the feature is selected while setting up an assignment, instructors will only see an anonymized learner name on assignment submissions.
NOTE: You must enable anonymous grading before students start to upload assignment submissions. You should also provide students with instructions to omit any identifying information from their document, including the file name.
To ensure the anonymity of submissions, you must grade completely within D2L.
Advise your students to remove their name and all identifying information from the assignment submissions and filenames.
Turnitin should not be used with anonymous grading, as it displays the students' names.
Tips for the effective use of anonymous grading:
- Publishing of evaluated submissions effectively ends anonymous grading . if you are accepting late submissions, they will not be anonymous.
- Grading may take place over multiple sessions, but publishing of graded submissions should be done all at once, to maintain anonymity.

Enable anonymous marking in an assignment
If you want to enable anonymous grading in an assignment, you can do this either when you are creating the assignment, or you can edit the assignment settings before any students submit.
- Expand the Evaluation & Feedback panel.
- Check the box beside Hide student names during assessment .
- Make sure you click on either Save or Save and Close .

Once you have saved your changes, if you return to Assessments > Assignments , you can see the anonymous grading icon indicated to the right of the assignment name.

Grade 'anonymous' submissions
When you are ready to grade student's submissions, go to Assessments > Assignments , and click on the name of the assignment to see the list of submissions.
Note that instead of seeing student names, you see "Anonymous User 1", "Anonymous User 2", etc.
Also note that you can still see the name of the file the student uploaded, so you will want to instruct students not to include their name or other identifying information anywhere in the file or filename. If you have mentioned to your students that you are grading anonymously, and need them to leave out identifying information, assure them that when they login to D2L Brightspace and upload a file, that file is permanently associated with their profile. There is no concern about losing track of which student uploaded a file.
Click on a file name or the ' Go to Evaluation ' link to view and grade the assignment.

Note that grading, providing markup comments and feedback are the same as regular assignments. You just can't see any information that identifies the student.
The only difference is that while grading anonymous submissions, you should save all marked assignments as Draft .

When you are done grading all submissions, and you are ready to publish all grades to the gradebook, and make all feedback available to students, return to the list of submissions, and click on the Publish All button.
It may take a few minutes to publish, particularly if you have a large class, so please be patient.

If you have not graded all students, you will receive a warning.
IMPORTANT: If you publish grading before you have marked all assignment submissions, you will lose the anonymous functionality. Once grading/feedback have been published, student names will be revealed.

You can now see all student names and their submissions.
Any submissions that have not been evaluated can still be graded in the usual way, and saved as Draft or Published.
If you decide to revisit a previously graded assignment submission after you have published, you will not see an active Draft or Publish button. Just make the changes and then click on "Next Student", and you will be prompted to save. You will then need to Publish All Feedback for the student to see the updated grade or feedback.
If you click on Publish All again, keep in mind that if you have made any changes to previously entered feedback for any students, it will all be updated at this time. If the grade item is visible, students who have notifications enabled, will receive a notification of the updated grade.
Evaluate assignments received on paper or observed in person

Mark assessments as "Complete"
Before you even start grading papers that have been submitted in person or presentations, you may want to quickly mark those students who have submitted or presented as "complete". This will enable you to see at a glance how many students have yet to complete the assignment.
1. Go to Assessment > Assignment , and click on the assignment name or View Submissions to see the list of students.

2. To mark those students who have completed the assignment, scroll down the list of student names, and select the checkbox to the left of each student's name.
3. Click on the Mark as Complete link, located above the list of students.

You can now see the date/time that each of these students was marked as complete.

Email students who have not submitted/presented
You may wish to check in or remind students who have not yet submitted their assignment or presented in class. Once you have marked the students who have completed their assignment as "complete", this is quite easy.
1. Click on the grey Email Users Marked Incomplete button.
2. A message window will open with the students added in the BCC field. Type in a subject line, compose the email message and click on Send . You will receive a copy of this message in your university email inbox.

Evaluate submissions
1. In your course shell, go to Assessment > Assignments .
2. Click on the assignment name to view the list of students.
3. To evaluate a particular student, to the right of the student's name, click on Go to Evaluation .

4. If you have associated a rubric with the assignment, it will be available at the top of the right-hand pane. Click on the name of the rubric you wish to use to evaluate this assignment. The rubric will expand in the pane.
5. Type the grade into the Overall Grade field.
6. If desired, you can type any feedback into the Overall Feedback field. You can also attach a file , a web link, record audio or video feedback, if you wish.
7. If you are not ready to publish grades to the gradebook, click on the Save Draft button. If you are done, click on the Publish button. Before you publish, you may wish to make sure the grade item is hidden , so that you can make sure that all students see their grade at the same time.
8. When you are ready to evaluate the next student's submission, click on the right arrow in either the upper right or lower right of the page. To return to the list of students, click on the Back to Submissions button, found in the upper-left of the page.
If you saved evaluations as Draft, make sure you publish grades to the gradebook when you are done grading. Also, when you are ready for students to see their grades, make sure that the grade item is visible.
Evaluate an assignment with no submission
What if the student didn't submit their assignment.
While you cannot submit the student's paper on their behalf - and therefore cannot use tools such as anotations - you can still provide the student with a score, completed rubric (if used) and written feedback.
Evaluators can provide the following for students who did not submit their assignment:
- A score grade
- A completed rubric (if applicable)
Evaluators will not be able to utilize the following tools without the student's submission:
- Annotations

First, go into the Assignments tool, locate the assignment you wish to grade, and click its title to view the submissions for that assignment.
By default, you should be shown a full list of the students, but if you only see a list of who did complete a submission, you can change the filter to show all students, so that you can find the student who did not complete a submsision.
Click the "Show Search Options" link.

Scroll down the page to the "Submissions" section and click the dropdown menu there.
Select the option to "Show everyone" .
Alternatively, if you only want to view the students who did not make a submission, you can select "Users without submissions" .
Next, look to the search field at the top.
To view a specific student , type the student's last name into the search field.
Click the magnifying glass icon . This will show a list of all students that match the search criteria.

Review the list of students that match the search criteria you set above.
In this example, you will see one student with an assignment submission, and one without.
Click the "Go to Evaluation" link, in either case, to provide the student with an assessment.
NOTE: While the above is an acceptable process, a much better solution is to add the student to "Special Access" with a different start/end date/time, allowing them to upload their assignment submission, so that all of your students' submissions reside within your D2L Brightspace course shell. This ensures easy follow-up, in the case of any kind of dispute.
Bulk publish feedback
Publishing feedback can serve two purposes:
- It pushes the grades into the gradebook, if you have connected the assignment to a grade item.
- It provides the students with their scores, feedback and rubric evaluations.
If you only want to push the grades into the gradebook, and you do not want the students to see the results, please see the workflow above to hide the assignment results from the students.
The steps below outline two options:
- Publish all feedback
- Bulk publish feedback for select students' submissions
Note that this will not display the results to the students, because we have hidden both the grade item and the assignment in the steps above.
- Click the "Publish All" button at the top of the page.

Not ready to publish all of the feedback? Select which ones to publish
The checkboxes can be used to select which students' grades and feedback should be published.
To publish feedback for select students:
- At the bottom of the page of submissions, review the number of submissions displayed per page -- raise this to a higher number, if necessary. The maximum will be 200 per page, so you may still have multiple pages of submissions.
- Use the checkboxes to select the student submissions to publish.
- Click the "Publish Feedback" link at the top of the list of submissions.
- If needed, repeat the process for each page of students.
Upload feedback (individual files)
Instructors may provide feedback directly within a student's submission (e.g. making track changes in Microsoft Word or Adobe Acrobat) and upload the feedback as an attachment. See the tutorial for instructions to download assignment submissions .
To upload individual feedback files:
1. On the Assignments Submission Folders page, click on the folder you want to evaluate submissions for or click View Submissions .

2. Select the file you wish to upload feedback for, by clicking on either the file name or Go to Evaluation .

3. Enter a score for the submission.
4. Click the file upload icon to upload a feedback file (e.g. a Word Doc, pdf, etc).
5. Select Publish .
Upload feedback (multiple files)
It is possible to upload all feedback files simultaneously, however the naming convention must be accurate so Brightspace can assign the correct file to the correct student.
The instructions outlined below can mostly be applied to both Mac and Windows.
PC Users will follow the steps with the following adjustments:
- After downloading the files and adding feedback to the documents, save the files and folders with the same names as downloaded. Do not change any of the file/folder names . Zip the folder and proceed to Step 3 .
- When adding the feedback files in Step 5 , simply add the zipped folder of all the feedback files.

1. When downloading the students' submissions , note the naming convention of the files once unzipped. Each student has their own folder and each folder begins with a unique code that identifies the student (e.g. 7627-9289). You will need these codes in order to proceed.

2. For each feedback file you wish to upload, copy the corresponding student code (e.g. 7627-9289) to the beginning of the feedback file.
- For example, if your feedback file is called "JDoe-Assignment1-Feedback.doc", and the student's unique code is 7627-9289, the filename must read "7627-9289 - JDoe-Assignment1-Feedback.doc".

3. Upload the feedback files by clicking on the appropriate assignment folder on the Assignments Submission Folders page.

4. Click Add Feedback Files

5. Drag and drop all feedback files or click Upload and select the appropriate files.
6. Click Add .
Be sure to check if the feedback was correctly assigned! We recommend reviewing the submissions of a couple of students and check that the appropriate feedback file has been uploaded.
To proceed with the rest of the grading, enter a score and select Publish .
- Instructor Documentation (Higher Ed)
- Welcome to the Higher Education Instructor Knowledge Base
- Log In to Brightspace
- Change your personal settings in Brightspace
- Welcome to Brightspace
- Course setup
- Start the term
- Activate your course
- About course administration
- Navigate Brightspace and find your course
- Best practices for creating a Course Homepage
- Customize your course navbar
- Automatically customize course content using replace strings
- Brightspace Virtual Assistant
- View your course using a different role
- Create accessible content in Brightspace
- Accessibility
- Adding an accessible template package to your course files
- Meeting web content accessibility standards
- Setting clear course expectations
- Making flexible time limits and deadlines
- Providing alternative learning materials
- Accessibility considerations
- Compliance to accessibility standards in HTML-authored content
- Directing learners to accessibility resources
- Scenarios for creating release conditions to increase accessibility in courses
- How assistive technology interacts with the inline grading experience
- Access course content using the ReadSpeaker docReader integration
- About Announcements
- Announcements
- Create a welcome message using the Announcements widget
- About Assignments
- Assignments
- Create an assignment
- Set availability and due dates for an assignment
- Set release conditions and special access in Assignments
- Copy an existing assignment
- Copy assignments to other courses
- Add and Edit categories to manage assignments
- Reorder, edit, and delete assignments and categories
- Hide draft assignments and content
- Align learning outcomes to assignments
- Preview assignments in Evaluation mode
- About anonymous marking
- Restricted File Extensions
- Assignments and Turnitin
Evaluate assignments using the Assignments tool
- Evaluate assignment activities
- Synchronize multi-evaluator grades between Grade Book and Assignments
- Evaluate assignment submissions from Content
- About Attendance
- File types supported by Annotations
- Assess assignments with grade schemes
- Create and manage attendance registers
- Create and manage attendance sessions
- About Awards
- Create and manage awards
- Create a blog
- About Brightspace Editor
- Brightspace Editor
- Insert and edit images with Brightspace Editor
- Insert and edit equations with Equation Editor
- About Calendar
- Manage course events with the Calendar tool
- Create a checklist
- About Class Progress
- Class Progress
- Track course progress with the Class Progress tool
- View course progress against Standards
- Accessing Class Progress data in the Brightspace Data Platform
- Change and reorder Main Indicators in Class Progress
- View assessment details on the Outcomes Progress details page
- About Classlist
- Review your Classlist
- Auditors and Bulk Auditor Management
- About Competencies
- Competencies
- Manage Competencies
- Create a learning objective
- Add a learning objective to a content topic
- Content experiences
- About course content organization
- What types of files can I use for course content?
- Use HTML templates in Content
- Improve navigation in multi-page content topics
- Notify learners about updated course content
- Add existing activities with Google Drive
- Add existing activities with OneDrive
- Create and integrate form templates in Content
- Using Virtual Classrooms and Video Assignments by Bongo
- View user progress in Content
- Change content display settings
- Add and organize learning materials in the Classic Content experience
- Fix broken links in Content
- Hide Content topics, modules, and downloads
- Add and organize learning materials in the New Content Experience (Lessons)
- ReadSpeaker integrations for Lessons
- Add availability and due dates in Content
- Add a Release Condition to Content
- Set a course timeframe
- Classic Content Experience
- View course content statistics
- Content statistics and completion tracking
- Track content completion and participation
- About Course Builder
- Course Builder
- Create a course with Course Builder
- New Content Experience (Lessons)
- Manage course waitlists
- Course Catalog
- Manage courses and programs
- Manage participants
- About Brightspace Creator+
- Create a presentation with the Capture App
- Using the Creator+ features of Brightspace Editor
- Create a presentation with Capture Web
- Manage learner self-enrollment with Discover
- About Discussions
- Create group work areas for learners
- Discussions
- Create discussion forums and topics
- Restrict a forum or topic to specific groups or sections
- Create a group thread in an existing topic
- Set up a quicklink to a discussion topic or forum within an existing Content topic
- Manage discussion forums and topics
- Evaluate discussions
- Email others using the Email tool
- About D2L Lumi Pro for Brightspace
- D2L Lumi Pro for Brightspace
- Disable your course address book
- About Consumption Dashboard
- About Brightspace ePortfolio
- Enable Brightspace ePortfolio reflections from Content
- Generate assignment ideas using D2L Lumi Idea
- About certified Brightspace artifacts
- Generate quiz questions using D2L Lumi Question
- About Form Templates
- Create FAQ questions and categories
- Generate ideas for discussions using D2L Lumi Idea
- About Grades
- Grading systems types
- Create a grading system
- About exemptions
- Grading systems
- How grade exemptions affect calculations
- Create Grading Schemes using the Grades tool
- Final Grades that include exemptions
- Grade exemptions
- Set up your Grade book
- Create and delete grade categories and items
- Import grade items
- Drop the lowest grade
- Delete grade items or categories
- Importing grades
- Gradebook icons and notifications
- About automatic transfer of overall score to a learner's grade
- Banner Grades
- Grade book Mastery View
- Managing event logs in grade book
- Setting up and configuring the Grade book Mastery view
- Setting up Outcomes for use with Grade book Mastery View
- Mastery View
- Publishing and retracting achievement evaluations in Mastery View
- Best practices for using Grade book Mastery View
- Manually overriding achievement levels in Mastery View
- Define Settings in the Grades tool
- Overall Achievement Calculation Settings
- Enter grades in the Grades tool
- Viewing Grade book Mastery View
- Manage Grades in the Grades tool
- Evaluate with the Grades tool
- Navigating in the inline grading experience
- About automatic zero grading for missing submissions
- Automatic Zero Grading
- Set release conditions for grades
- How course activity types interact with automatic zero grading
- About Groups and Sections
- Create categories and groups
- Create a section
- Groups and Sections
- About Import/Export/Copy Components
- Import, export, or copy course components
- Import/Export/Copy Components
- Integrity Advocate Remote Proctoring in D2L Brightspace
- View and Override Proctoring activity
- Integrity Advocate
- About Intelligent Agents
- Set up Intelligent Agents
- Intelligent Agents
- Run Intelligent Agents
- Using the Brightspace LeaP wizard
- Setting up learning paths
- Update learning paths
- Add a learning path link to Content in 10.3 or higher
- Using the Content Report
- Using the Progress Report
- Using the Outcomes Report
- Using the Activity Report
- Grading with LeaP
- About Brightspace Learning Object Repository
- Browse the Brightspace Learning Repository
- Learning Object Repository (LOR)
- Publish (add) objects to Brightspace Learning Repository
- Retrieve learning objects
- Manage learning objects and collections
- Review learning objects
- RSS feeds in Brightspace Learning Repository
- Create and delete a link or link category
- Manage locations
- About Manage Dates
- Bulk edit dates in Manage Dates
- Manage Dates
- About Manage Files
- Create a Content topic in Manage Files
- Apply content permissions to folders in Manage Files
- Manage Files
- About Media Library
- Manage audio-video content with Media Library
- Media Library
- Upload, edit, and play audio-video content with Media Player
- View and download audio-video transcripts
- Media Player
- Gain personalized insight about individual learners
- Learner Engagement Dashboard
- About predictive charts
- Performance+
- Interpreting the Assessments predictive chart
- Interpreting the Social Learning predictive chart
- Interpreting the Success Index predictive charts
- How does Brightspace Student Success System work?
- Student Success System (s3)
- Make predictions about learner success and risk levels
- Brightspace Student Success System areas
- Brightspace Student Success System domains
- Monitor weekly success and risk in your class
- Interpreting the win-loss chart
- Troubleshooting: I can't access Brightspace Student Success System
- Using the Students at Risk widget
- Students at Risk widget
- Class Engagement interface overview
- Easily access analytics about learners and your course
- About Portfolio
- Define Portfolio class settings
- Student at Risk widget
- Using Brightspace Portfolio for higher education and corporate learning
- Archive evidence
- Course Overview widget
- About Quizzes
- Create and configure a quiz
- Manage questions in the Quiz Builder
- Review and assess submitted Portfolio evidence
- Applying Respondus LockDown Browser to a quiz
- Manage quizzes with learner attempts
- Grade with Quick Eval
- Retake incorrect quiz questions in subsequent attempts
- Evaluate quizzes
- View quiz statistics and attempt logs
- Manage quiz questions
- Quizzes FAQ: Hot tips and workarounds
- About Question Library
- Import questions into the Question Library
- Creating Question Library questions
- Question Library
- Managing questions in Question Library
- Quizzes and Question Library
- Delete and copy questions from Question Library in a quiz
- About Rubrics
- Release Conditions
- Create a rubric using the Rubrics tool
- Evaluate assignments using the Rubrics tool
- Manage Rubrics through the Quicklinks menu
- About Release Conditions
- Import and manage SCORM
- Track activity and user progress on SCORM objects
- Create and manage seating charts
- Associate course content with Standards
- Seating Charts
- Set up Surveys
- Track survey progress and results
- Standards (Also known as Learning Outcomes, Expectations, Competencies, or Objectives)
- Create and insert a video note in Brightspace Editor
- Add subtitles to video topics
- Manage widgets on your homepage
- Set up the Activity Feed widget and post
- Post assignments using the Activity Feed widget
- Activity Feed widget
- Control commenting on Activity Feed posts
- About the Create Course widget
- Create a course in the Create Course widget
- Create Course widget
- Homepage Widget Expansion Pack
- Using the My Org Units widget
- Using the Photo Banner Widget
- Using the Slim Announcements Widget
- Using the Visual Table of Contents (TOC) Widget
- Using the Welcome Window Widget
- Create a widget-based homepage
- Displaying course grouping tabs in the My Courses widget
- Review learner course assignments with the Work To Do widget
- Change personal settings with the My Settings widget
- My Courses widget
- Glossary of Icons
- Glossary of Terms
- Documentation changes for higher ed instructors
The Evaluate Submission page enables you to evaluate and leave feedback on assignment submissions. It contains two main sections: The Submissions List panel and the Evaluation panel. Use the Evaluation panel to grade and provide comments on submissions. On paper submissions and observed in person assignments display only the Evaluation panel, as no submissions are made in Brightspace.
| For more information about evaluating and adding feedback to assignments using a screen reader or keyboard-only navigation, refer to . |
Evaluate assignment submissions
You can either publish feedback immediately or save your feedback as a draft and release it later. This enables you to revise and review evaluations and publish your feedback to multiple users at the same time. You have the option to retract published feedback to provide an update to past evaluations, ensuring learners access your most recent feedback.
Assignment submissions have status indicators to note the state of the evaluation.

| You cannot publish or save your draft if the field exceeds 300,000 characters. If the field exceeds the character limit or if the contains an invalid grade, attempting to save or publish causes a dialog to appear with the tooltip "There is one or more errors in the information entered appears". |
Check an evaluation status
When there are multiple evaluators assigned, you can check assignment status and additional information with hover text.
To check an evaluation status
- Navigate to the Assignments tool.
- Open an assignment which status you want to check.

Figure: Hover your cursor over an assignment in the Users tab to view additional information.
Refer to Advanced Assessment for Assignments in test, development, and staging environments of Brightspace for more information.
Make one shared evaluation ready for review
As an evaluator, you can reduce communication errors during the evaluation of co-marking and delegation assignments when publishers and evaluators are not the same person. When you have completed your evaluation, set the evaluation to Ready for Review to inform the publisher that the evaluation is ready and can move on to the next phase.
To use one shared evaluation and ready for review
- Click Create an assignment and in Evaluation & Feedback > Coordinate Multiple Evaluators select One shared evaluation .

When the assignment is submitted, on the Assignments page, click on your assignment.
On the Submissions page, click the assignment.
Click Ready for Review .

A dialog appears stating that the Evaluation is ready for review , and the button at the bottom changes to Update .

Figure: You can click the Update button on Submission Review page to update your evaluation.
Once you, as an evaluator, click Ready for Review , the evaluation is ready for reviewing and publishing. Publishers have access to the Publish button.
Video: Assign Evaluators and Publishers in Assignments
Evaluate using annotations
If you have built in annotations turned on, you can mark up submissions using highlighting, free hand drawing, shapes, and associated commenting directly from the Evaluate Submission page. Use the icons in the document viewer toolbar to select between Drawing , Note , Text , and Line . You can undo or redo any annotations using the undo or redo buttons located on the menu or using keyboard shortcuts. The keyboard shortcuts for PCs are Ctrl+z for undo and Ctrl+Shift+z for redo. For MAC OS, the shortcuts are Command+z for undo and Command+Shift+z for redo.
| Text annotations have a character limit of 1,048,576 characters. |
Each tool has additional options to change color, font size, font, and many other customizable items. Once you publish the feedback, learners can view their submission with the annotations visible, providing additional context.
For information about file types that are supported by the annotation tool in Assignments, refer to File types supported by Annotations
Download and evaluate assignment submission files
If you download user submissions and leave feedback within the files, you can upload them back to the appropriate assignment so they appear as attachments to each user's submission evaluation. To ensure successful feedback upload and distribution back to learners, do not rename the downloaded files' names after you enter feedback and save changes.
To evaluate and add feedback to downloaded submissions
- Navigate to Assignments .
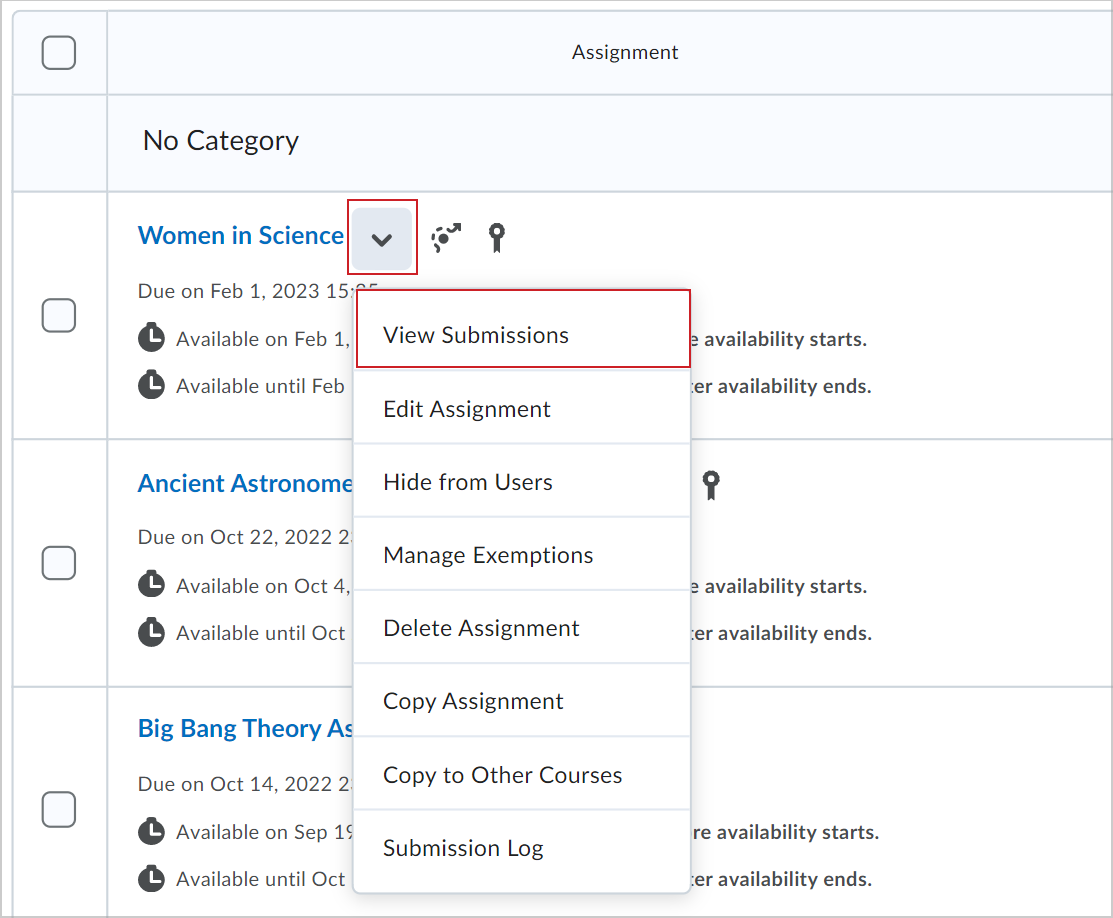
- Select Select all rows and then click Download . This creates a .zip file.
| Each user submission folder has a numeric ID prefixed to the folder name. This ID is key when you are uploading the evaluated submission files and it should not be changed. Example downloaded file name with the numeric ID: 30230-29 - John Doe - May 29, 2020 122 PM. |
- Open each assignment, evaluate the assignment, add your feedback, and then save the file.
| If you have any learner names with characters that cannot be used in a compressed folder, such as Ø, rename that folder and reattempt to create a .zip folder. Do not change the ID prefixed to the name of the folder. |
| Learners can review feedback files in the assignment or in the Grades tool. |
- To publish feedback to selected learners select these learners and click Publish Feedback .
- To publish feedback to all learners, click Publish All Feedback . If the Publish All Feedback button is grayed out, you have no draft feedback to publish. If you have Anonymous Marking enabled, you must click Save Draft and save your feedback for each anonymous user, then click Publish All Feedback on the assignment page to submit feedback to the anonymous users.
- If you have any rubrics attached to learner submissions and if these learner submissions have not been evaluated on all rubric criteria, a Confirmation dialog box appears indicating the same. Click Continue Grading or Publish Anyway , as applicable.
| The link appears when you have the permission turned on for your role. |
- To evaluate using learning outcomes, select the desired level of achievement below the outcome.
- When you leave feedback in Turnitin, the feedback icon on the assignment submission page, in the Turnitin Online Grading column.
- If you added an Online Grading score, the score displays on the submissions page, in the Turnitin Online Grading column.
Add assignment submissions to Brightspace Portfolio
You can add assignment submissions to Brightspace Portfolio. When you add an assignment submission to Portfolio, all submission versions, feedback, and grades are added to Portfolio.
You can then review the submission as evidence in Brightspace Portfolio and share that evidence with Parents and Guardians.
Once you add a learner's submission to Portfolio as evidence, it is treated as a record of work as assignment evidence independent of the Assignments tool. Assignment submissions added to Portfolio as evidence remain in the learner's Portfolio after the course has ends.
| : You must ensure that your administrator has correctly set up Brightspace Portfolio for your instance of Brightspace before starting this process. As part of this setup, your administrator must assign you appropriate role permissions to enable you to add assignment submissions to Portfolio from the Assignments tool. You must also ensure that learners have permission to view the assignment being added to Portfolio. Refer to for more details. |
To add an assignment submission to Portfolio
- Navigate to the Assignments tool and click on an assignment.
- From the Submissions page of that assignment, click Users .
- Locate a user that has completed an assignment submission.

- From the Add this Assignment to Portfolio? dialog, click Add .
The selected learner's assignment submission is added to their portfolio as evidence. This evidence remains in the learner's Portfolio after the course has ended.
| : Assignment submissions that are added to Portfolio do not automatically update when you add grades or feedback to the assignment submission from the Assignments tool. If you want updated grades or feedback to be included with a submission added to Portfolio, you must add the submission to Portfolio again to update. The newer version of the submission is added as a new and separate piece of Portfolio evidence and does not replace the original submission. |
Evaluate video submissions
You can give grades and feedback for video files that learners attach and submit as part of an assignment.
To evaluate video submissions
- Click the Actions drop-down menu beside your desired assignment and then select View Submissions .
- Click the Submissions tab.
- Select the video submission and click Download . Save the .zip file and review.

| You can also provide feedback by attaching a separate file to a submission. On the page, click . Select your compressed .zip file and then click . |

- Click Publish .
If your assignment is associated with a grade item in your Grade Book, the Overall Grade you entered is automatically added to your grade book. To review and edit the Overall Grade of all evaluations applied to that grade item, click the Assignment attached icon next to the Overall Grade field to open your grade book. For more information about grade items, refer to Create and delete grade categories and items .
| You cannot publish or save your draft if the field exceeds 300,000 characters. If the field exceeds the character limit or if the contains an invalid grade, a dialog pops up and the tooltip "There is one or more errors in the information entered appears" when you try to save or publish. |

Video: Grade submissions in Assignments
About the New Assignment Evaluation Experience
The New Evaluation Experience brings consistency to evaluating in Brightspace for all assessable tools. For now, the experience is only available in Assignments and Discussions.
When you attempt to delete a rubric that is attached to an evaluated assignment, you must confirm that they want to detach the rubric from the assignment. This alert is intended to prevent potential data loss, because once a rubric is detached, the existing assessments for that rubric are deleted and cannot be restored.
The New Assignment Evaluation Experience uses the new Brightspace Editor as the default HTML editor.
| The new editor does not require administrators to enable the new configuration variable. It is automatically enabled for feedback when you turn on the New Assignment Evaluation Experience. |

Figure: Use the Overall Score slider in mobile and the New Assignment Evaluation Experience views to view and override the score level.
Video: Grading submissions in Assignments
myUnisa Online Assignment Submission Tool Help file
How to resubmit a written assignment, how to submit a multiple-choice assignment, how to resubmit a multiple-choice assignment.

You're signed out
Sign in to ask questions, follow content, and engage with the Community
- Canvas Student
- Student Guide
- How do I upload a file as an assignment submission...
- Subscribe to RSS Feed
- Printer Friendly Page
- Report Inappropriate Content
How do I upload a file as an assignment submission for a course using Assignment Enhancements?
in Student Guide
Note: You can only embed guides in Canvas courses. Embedding on other sites is not supported.
Community Help
View our top guides and resources:.
To participate in the Instructure Community, you need to sign up or log in:
IMAGES
COMMENTS
Contact your instructor if you don't see an assignment you think you should. If you submit after the due date, your submission is marked LATE and penalties may apply. The digital dropbox has been replaced by the assignments tool in Blackboard Learn. If your instructor has asked you to submit something to the digital dropbox, ask for other ...
Easily distribute, analyze, and grade student work with Assignments for your LMS. Assignments is an application for your learning management system (LMS). It helps educators save time grading and guides students to turn in their best work with originality reports — all through the collaborative power of Google Workspace for Education. Get ...
To re-submit an assignment submission. Navigate to the Assignments tool in your course. Click on the assignment folder where you would like to edit or delete a submitted file. Figure: Assignment folder with an existing submission. Click Add a File to add another file to the assignment folder. Enter any comments you want to submit with this new ...
Depending on the assignment submission type set by your instructor, not all file types may be available for your assignment submission. Not all of your assignments may be submitted online. If you cannot see the Start Assignment button, your instructor may want you to submit your assignment in a different way or the availability date has passed.
Assignments. The Assignments tool enables you to upload and submit assignments directly into Brightspace. Simply upload your submission to the appropriate assignment and submit. Note: If you cannot locate or access the Assignments tool, it may have another name.Contact your instructor for more information. Visual tour of the Assignments tool
To create an assignment from the Assignments tool. Navigate to Assignments. Click New Assignment. Fill in assignment details. When creating a new assignment, start by entering basic details such as name, grade scheme, due date, and description. ... Under Assignment Submission Folder, select the assignment submission folder in which this ...
When you create an assignment, a Grade Center column is created automatically. From the Grade Center or Needs Grading page, you can see who has submitted their work and start grading. Students access their grades from their My Grades pages or the assignment's Review Submission History page.. You can also create a group assignment and release it to one or more groups in your course.
To upload a file, you can either drag and drop it from your computer into the Submission box, or select Attachment - represented by the paper clip icon- and browse for a file from your computer. A status window appears to show the progress of the file upload. Your assignment will be automatically saved after 2 seconds.
University of South Africa UNISA Assignments Submission. User Name: Password
Select Online Entry Options. Select the online entry options you want to allow for the assignment. You can select up to four options: Text Entry [1]: Students can submit their assignment directly in the Rich Content Editor. DocViewer annotations are not available for text entry submissions. Additionally, text entry submissions cannot be re ...
The Canvas Assignments tool is one of several native Canvas tools that allows instructors to collect student work for grading. Through the Canvas Assignment tool, students can submit their completed work and instructors can easily collect and score the work either offline (by downloading all submissions with a single button click) or online through the Canvas SpeedGrader function.
The Assignments tool in UB Learns offers robust features to customize instructions, submissions and assessment types. Tools that complement Assignments include Content, Rubrics and Grades. ... Submission type (file, text, on paper submission or observed in person). Files allowed per submission (students can upload only one file or an unlimited ...
About Assignments - Brightspace. About Assignments. You can use the Assignments tool to create and edit assignments, see users' submission times, view submissions on the Evaluate Submission page, associate assignments to rubrics and competencies, and return submissions with grades and feedback. For assignments that included file submissions ...
File Uploads: For students to upload files for submission (Restrict Upload File Types will allow you to limit which types of files may be submitted). On Paper: For assignments students will submit in person. External Tool: For assignments which students will submit through a third-party tool (such as Turnitin, Panopto Video Quiz, and PlayPosit).
Assignments Tool. Assignment Dropbox is where users can submit files for assignments. TurnItIn originality checking is integrated with Assignments, generating originality reports to review possible instances of plagiarism in submitted files. Submitted files can also be evaluated within the Assignments tool, and evaluations can be associated ...
After clicking Start Assignment, you will see tabs that indicate different submission types. To upload one or more files as your submission, click the File Upload tab. To upload a file from your device, click the Upload File button. Click the Choose File or Browse button to select a file to upload. A pop-up window will display in your browser.
Each student has a limited amount of time to submit. The assignment attempts are saved and submitted automatically when time is up. You can also allow students to work past the time limit. Time limits can only be added to individual (not group) assignments. Add a grading rubric. A rubric is a scoring tool to evaluate graded work.
Submit File Upload. To upload a file as your submission, click the Upload button [1] To upload a file from your computer, drag and drop a file [2], or browse your computer files by clicking the Choose a file to upload link [3]. To capture a photo of your assignment using your computer's webcam, click the Webcam button [4].
First, go into the Assignments tool, locate the assignment you wish to grade, and click its title to view the submissions for that assignment. By default, you should be shown a full list of the students, but if you only see a list of who did complete a submission, you can change the filter to show all students, so that you can find the student ...
Evaluate assignments using the Assignments tool. The Evaluate Submission page enables you to evaluate and leave feedback on assignment submissions. It contains two main sections: The Submissions List panel and the Evaluation panel. Use the Evaluation panel to grade and provide comments on submissions. On paper submissions and observed in person assignments display only the Evaluation panel, as ...
Dr Molotsi & Ms Jodi-Leigh give a step by step on two different ways which students may submit their assignments
Find the course code · Find the course code of the assignment your want to submit in the Course column · Find the corresponding number of the assignment, e.g. 2 in the Ass.No. column · Click on the Submit link in the Action column next to the assignment number Step 1: Load assignment file from your PC to myUnisa · Click on the Browse button ...
Click the Upload option [2]. If your instructor only allows File submissions, the Upload File tool displays in place of the Choose a submission type section. Notes: If the Upload submission type does not display, your instructor has restricted this submission type. Not all of your assignments may be submitted online.